React Native Animated Ring Around Uploaded Profile Picture
Almost every social networking app allows its users to upload and post an prototype. Most apps even allow you fix a profile picture for your account. All these apps access your device'due south camera and gallery through an image picker.
In this post, I'll walk you through the essentials of using an epitome picker in your React Native app. Somewhen, you'll learn to build a component to upload profile pictures that you lot can utilise in your apps right away.
Get Started Adding an Image Picker to Your Expo App
For this demo, I'm using Expo CLI for building React Native apps rapidly and easily. To become started, create an Expo CLI project by running the following command:
expo init react-expo-epitome-picker-guide
Then, open up the projection in an editor.
cd react-expo-image-picker-guide
Install expo-paradigm-picker
Expo provides an easy way to add together an paradigm picker in your React Native app. It offers a uncomplicated library called expo-paradigm-picker. Allow's install information technology by running the following command:
npm i expo-image-picker
Then, jump-start your Expo server by running
expo starting time
Great! Now you've installed the expo-image-picker library. Simply before nosotros can use information technology, we accept to create a component to let our users upload an image. Allow's practice that next.
Create an Upload Image Component
Consider the employ example of uploading your profile picture in an app. This is how the app'due south flow should look: You lot click a push that opens the image picker. Information technology then allows you to cull an paradigm from your device.
It would be overnice to accept an independent and reusable component that does the above. For this purpose, let's create an <UploadImage> component. Create a new file called UploadImage.js. Add the post-obit lines of code inside information technology:
import React, { useState, useEffect } from 'react';
import { Image, View, Platform, TouchableOpacity, Text, StyleSheet } from 'react-native';
import { AntDesign } from '@expo/vector-icons';export default function UploadImage() {
const [paradigm, setImage] = useState(null);
const addImage=()=>{};return (
<View style={imageUploaderStyles.container}>
{
image &&<Image source={{ uri: epitome }} style={{ width: 200, peak: 200 }} />
}<View style={imageUploaderStyles.uploadBtnContainer}>
<TouchableOpacity onPress={addImage} style={imageUploaderStyles.uploadBtn} >
<Text>{image ? 'Edit' : 'Upload'} Epitome</Text>
<AntDesign name="photographic camera" size={xx} color="blackness" />
</TouchableOpacity>
</View></View>
);
}const imageUploaderStyles=StyleSheet.create({
container:{
elevation:2,
summit:200,
width:200,
backgroundColor:'#efefef',
position:'relative',
borderRadius:999,
overflow:'subconscious',
},
uploadBtnContainer:{
opacity:0.vii,
position:'absolute',
correct:0,
bottom:0,
backgroundColor:'lightgrey',
width:'100%',
height:'25%',
},
uploadBtn:{
display:'flex',
alignItems:"center",
justifyContent:'middle'
}
})
The higher up code should brandish a greyness circle on the screen. You can imagine this equally a placeholder for your image. This is where the uploaded image volition be displayed.
At the bottom of the gray circle, there's a small-scale button to trigger the image picker's functionality. Thus, when the user taps on the Upload Image button, the app should permit the user choose an image from their device.
Adjacent, create a land paradigm to shop the selected paradigm'due south URI. This URI will be used to render the image inside an <Prototype> component. Yous tin then conditionally return this <Prototype> component to display the image inside the circumvolve.
Render the above <UploadImage> component inside App.js. Your App.js should look like this:
import React from 'react';
import { StyleSheet, Text, View } from 'react-native';
import UploadImage from './UploadImage';export default office App() {
return (
<View style={styles.container}>
<UploadImage/>
<Text fashion={{marginVertical:20,fontSize:sixteen}}>Welcome, FuzzySid</Text>
</View>
);
}const styles = StyleSheet.create({
container: {
padding:l,
backgroundColor: '#fff',
alignItems: 'eye',
justifyContent: 'center',
},
});
Permit's see how the <UploadImage> component appears on the screen.

You now have a minimal UI template. Awesome! Side by side, permit's add together an image picker to this component to brand information technology functional.
Utilise expo-image-picker to Select and Upload Images From Your Device
Earlier, you lot installed the expo-image-picker module. It opens the arrangement UI for choosing an prototype and getting the selected image'south URI, acme, width, etc.
Import the ImagePicker module inside UploadImage.js.import * as ImagePicker from 'expo-image-picker';
Inside the addImage() method, call the launchImageLibraryAsync() method on the ImagePicker instance as shown beneath. Since this is an asynchronous method, you lot tin employ the await keyword inside addImage().
const addImage = async () => {
let _image = await ImagePicker.launchImageLibraryAsync();
}
This method is responsible for opening the system UI to select images from the user's device. On my Android device, it opens the system UI for selecting an image that looks like this:
The launchImageLibraryAsync() method as well receives an options object as a parameter. Pass the following options to this method:
const addImage = async () => {
let _image = await ImagePicker.launchImageLibraryAsync({
mediaTypes: ImagePicker.MediaTypeOptions.Images,
allowsEditing: truthful,
aspect: [4,iii],
quality: 1,
});
};
Let's swoop deeper and sympathise what each property means and how to utilize them.
Allowed File Types
The mediaTypes key validates the chosen files for your image picker. In other words, it tells the prototype picker which files the user is allowed to select. To simplify this, the ImagePicker module provides a MediaTypeOptions belongings. You lot can ready information technology to be any of the post-obit:
- MediaTypeOptions.All to allow both images and video
- MediaTypeOptions.Images to allow only image files
- MediaTypeOptions.Videos to let just videos
In this case, the user needs to upload an epitome as their profile picture. For this reason, the mediaTypes belongings is prepare to MediaTypeOptions.Images.
Default Editing Interface
The next property is allowsEditing. By default, its value is imitation. This indicates that the image will exist taken every bit information technology is on selection. Setting information technology to true volition provide an editing interface after y'all cull an prototype.
Y'all volition exist able to crop, rotate, or flip the selected image depending on your Bone and organisation UI. For instance, on my device the editing interface allows me to do all of the above and looks like this:

There'southward also an attribute holding that specifies a fixed aspect ratio for your cropped prototype. You tin can imagine this as a validation cheque on your cropped image. The editing interface will allow you to crop the image in such a manner that information technology maintains the specified aspect ratio.
Note that the expo-epitome-picker documentation mentions that the aspect belongings "is only applicative on Android since on iOS the crop rectangle is ever a square."
Thus, yous must exist aware that the attribute ratio property will have no result on iOS devices. If you want, y'all can skip this holding based on the device's OS.
Image Quality
If yous use WhatsApp, you've probably noticed how it compresses images and reduces their quality to mitigate the file size. Decision-making the amount of pinch you want on your images is a great way to upload files faster at low network speed.
You lot can control the quality of your selected paradigm using the quality property. Information technology takes in an integer representing the rendered image's quality. Y'all can pass any value between 0 and 1. The onetime denotes the lowest quality and the latter denotes the highest quality.
For brevity, the value of quality is gear up to 1 in this case. You can try adjusting this value to encounter its affect on the rendered image.
Render the Selected Image
At present that you have a functional prototype picker, allow's render the selected image on the screen. Recall that inside the addImage() function, the ImagePicker.launchImageLibraryAsync() method returns an epitome object. If you log this object to the console, you'll observe it has the following properties:
{
"cancelled":imitation,
"width":1080,
"blazon":"prototype",
"uri":"file:///data/user/0/host.exp.exponent/cache/ExperienceData/UNVERIFIED-192.168.1.5-react-expo-image-picker-guide/ImagePicker/a590d059-f144-45fe-ba8e-fc26b3c40aee.jpg",
"acme":810
}
- cancelled, which indicates if the system UI was airtight without selecting an image
- width and height, which specify the dimensions of the selected image
- type to denote the file type (image in this case)
- uri property, which holds the URI of the image
Shop this image'due south URI inside the image state. Your entire addImage() function should at present look like this:
const addImage = async () => {
allow _image = look ImagePicker.launchImageLibraryAsync({
mediaTypes: ImagePicker.MediaTypeOptions.Images,
allowsEditing: true,
attribute: [4,iii],
quality: 1,
});console.log(JSON.stringify(_image));
if (!_image.cancelled) {
setImage(_image.uri);
}
};
Let's examination this out at present. Click on the Upload Epitome push and choose an prototype. Yous'll run into the selected image being rendered inside the circle, as shown below:

Notice how the upload push button says "Edit Prototype" instead of "Upload Image." If you lot click on the Edit Paradigm button, you'll be able to choose a unlike paradigm using the same epitome picker. You at present have a custom and completely reusable upload paradigm component that you can use anywhere in your app.
Bank check for Gallery Permissions
It'southward ever a good practice to check if your user has immune your app to access their device's gallery. When you lot apply Expo to build and test apps, Expo automatically asks you the necessary permissions.
However, in production, it'southward always safe to write the lawmaking that takes care of this. Yous can use a uncomplicated method on the ImagePicker instance called getMediaLibraryPermissionsAsync(). It returns an object with a status belongings.
If the value of condition is granted, then your app is allowed to access the user'south gallery. Otherwise, you can show an alert to ask the user to grant necessary permissions. Create the below role that does all of this:
const checkForCameraRollPermission=async()=>{
const { status } = await ImagePicker.getMediaLibraryPermissionsAsync();
if (status !== 'granted') {
alert("Please grant camera gyre permissions inside your system's settings");
}else{
console.log('Media Permissions are granted')
}}
There'south an important thing to note here. You lot should phone call this method before whatsoever functionalities of your image picker are triggered by the user. To put it some other way, telephone call this method before the user clicks on the Upload Epitome button.
The all-time identify to do and so is within the useEffect. It fires when your <UploadImage> component mounts on the screen.
useEffect(() => {
checkForCameraRollPermission()
}, []);
The higher up code ensures that the checkForCameraRollPermission() part is fired before the user performs whatever interaction with the image picker. The first time you use the app, you should run across a permissions popup:

Something similar should pop up to your users when they utilise your app for the get-go time.
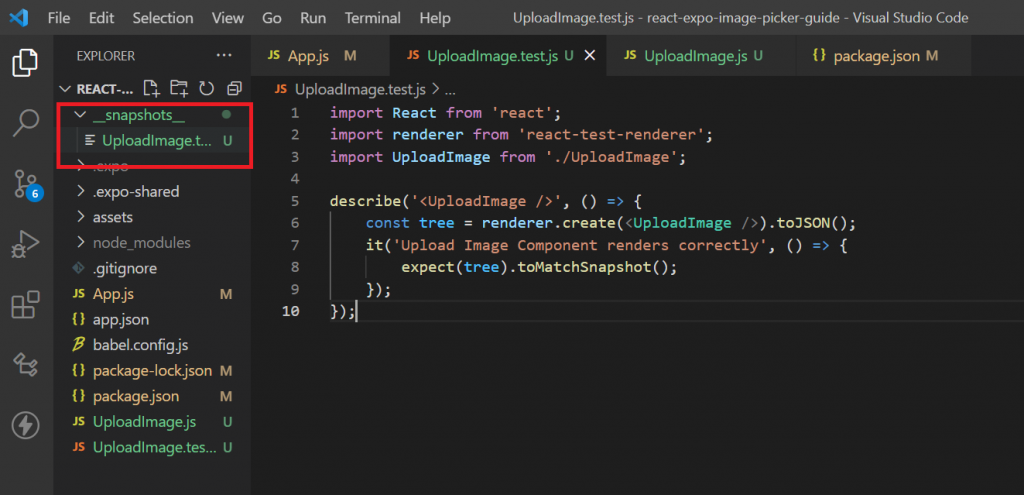
How to Test the Upload Epitome Component
Allow'due south test the <UploadImage> component using snapshot testing. A snapshot exam is used to validate whether your component renders consistent UI. Yous can use Jest to easily perform snapshot testing. You can read more about snapshot tests here.
Set up Jest Environs
Install Jest by running
npm i jest
As well, install react-test-renderer by running
npm i react-test-renderer
Adjacent, head over to your parcel.json file. Outset, add together a elementary script to run the test.
{
...
"scripts": {
...
"test": "jest"
},
...
}
Then, add together the following configurations:
{
...
"jest": {
"preset": "jest-expo",
"transformIgnorePatterns": [
"node_modules/(?!(jest-)?react-native|react-clone-referenced-chemical element|@react-native-community|expo(nent)?|@expo(nent)?/.*|react-navigation|@react-navigation/.*|@unimodules/.*|unimodules|watch-expo|native-base|@watch/.*)"
]
},
...
}
Write and Run Snapshot Test
Inside the root directory, create an UploadImage.test.js file. Add the following lines of lawmaking:
import React from 'react';
import renderer from 'react-exam-renderer';
import UploadImage from './UploadImage';describe('<UploadImage />', () => {
const tree = renderer.create(<UploadImage />).toJSON();
it('Upload Image Component renders correctly', () => {
expect(tree).toMatchSnapshot();
});
});
And that's it! You lot've written a simple snapshot examination for your <UploadImage> component. Use the following command to run the test:
npm run test
When you run the above command, Jest automatically runs all your test files. In this example, it'll run your UploadImage.test.js file. The offset fourth dimension you run the test, yous should see a success bulletin in your console like this one:

An UploadImage.examination.js.snap file would be created inside the __snapshots__ directory.
When you run subsequent tests, Jest will generate a new snapshot. Each of these snapshots will then exist validated confronting the previously stored snapshot inside the __snapshot__ directory. This is precisely how the UI consistency of your <UploadImage> component would be validated.
Jest is dandy for unit and integration tests, but for more avant-garde functionality testing, check out Waldo. It offers reliable and automated tests that you lot can run directly from your browser. It besides helps you fix potential issues and integrates well with popular CI/CD tools right out of the box.
Explore Farther
This should be a smashing starting betoken to add together an prototype picker into your own React Native app. If you're using React Native CLI for your project, you can check out react-native-paradigm-picker. Information technology's just as useful and like to expo-image-picker but for React Native CLI projects.
Also, there's a lot more you can exercise with an image picker beyond what I covered in this mail service. For instance, you can let your users directly take a picture through it. Y'all can even allow users to add videos through it. Having these features on your app could be a dealbreaker for y'all! You lot can scan through the docs for some reference on these.
Moreover, you can build your own image picker UI instead of using the system UI for adding images. If you're ready to build a more interesting image picker for your app, yous can try cloning Instagram's image picker. I'grand sure it's going to be an interesting exercise!
This post was written past Siddhant Varma. Siddhant is a total stack JavaScript developer with expertise in frontend engineering. He's worked with scaling multiple startups in India and has feel building products in the Ed-Tech and healthcare industries. Siddhant has a passion for didactics and a knack for writing. He's likewise taught programming to many graduates, helping them become improve time to come developers.
Source: https://www.waldo.com/blog/add-an-image-picker-react-native-app
0 Response to "React Native Animated Ring Around Uploaded Profile Picture"
Post a Comment